-
PRODUCT QUALITY
All products ordered through Studio Love Canada are of the highest international standards. We manufacture our items using the best decorations techniques available.
-
PRIVACY
Studio Love Canada treats all your personal information as strictly confidential. We do not share any of your information with third parties.
-
SECURITY
All data transferred between your terminal and our servers are over a SSL-channel (Secure Socket Layer) to make sure the data is protected.
Using the Designer
Studio Love 's powerful online designer allows you to:
- Upload images and create full-color designs for a wide range of products.
- Create and maintain your gallery of designs.
- Mix design elements - single image or multiple images, digital photos or artwork, as well as text.
- Create mixed decoration designs combining both digital printing and embroidery.
Quick Start Tips
To decorate the current product
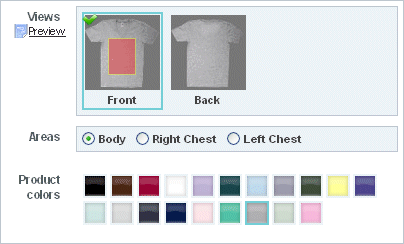
- Select a product view - e.g. 'Front'.
- Select an area to decorate - e.g. 'Left Chest'.

- Add designs and/or add text to the area.
- Check color, sizes, and quantity.
- Add to cart.
To choose a different product to decorate
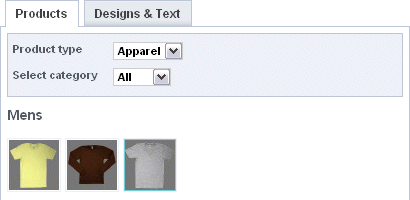
- Select the Products tab.

- Select a different product.
- Decorate as outlined above.
To save a custom-designed item for later use
- Click the Save Design button near the bottom-right.
To make changes to a custom product already in the cart
- Click the Cart tab.

- Click the product you want to change.
- Make the desired changes.
- Update the item.
To add an additional variation of an existing custom product
- Click the Cart tab.
- Locate the existing product you want to vary.
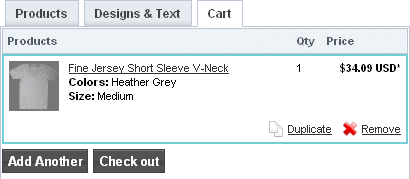
- Click Duplicate to add a copy of that product to the cart.
- Click the product duplicate.
- Make the required changes.
- Click Update Item.
To start designing a different custom product
- Click the Cart tab.
- Click Add Another.
- Choose the new blank product you want.
- Add designs and text as desired.
- Click Add to Cart.
Note: To complete the purchase, click Check Out in the Cart tab. See below.
Adding Images
Uploading images
Designs can comprise single or multiple images - stock or your own. Before using your own, you must upload them from your computer.
- In the Designs & Text tab, click the Add Printing Design button.

- The Select Artwork dialog will appear. Select the My Designs folder in the Categories listing.
- Use the Browse button upload an image from your hard disk or network.
Adding images to products
Once you have uploaded an image, you can use it on a product.
- Click the Add Printing Design button to open the Select Artwork dialog.
![[]](/uploads/11348727/Image/add_print_image.gif)
- Select the My Designs folder to view your own uploaded images.
- Select the image you wish to add, and click the Select Image button in the popup. The image will appear on the product.
- Repeat the process to add more images to your design.
Supported file types
TheStudio Love 's online designer handles a range of different image types, including:
- JPG
- PNG
- GIF
- TIF
Tip: If you intend to upload an image containing a transparency, we recommend using PNG format.
Optimum image size
Uploaded images should be as large (hi-res) as possible.
- When you upload an image, the online designer will automatically scale it as large as possible without losing quality.
- Scale it down to suit your purposes.
- If you scale the image up, you will notice the quality meter turn from green to amber.
- If you go into the red, a warning notice appear. This indicates that the uploaded image cannot be printed or embroidered at the size you require. You will either need to provide a higher resolution image or reduce the size of your design.
- If you add a product to the cart containing an oversized image, you will be warned that this will result in a poor quality product.
Moving & Scaling Images
Selecting
Once you have added artwork to your product, select it by clicking it. Sizing handles will appear at the extremities of the image. It will also appear within the control panel on the right. This panel gives you further control of the image.
Layering
Layering your items gives you greater control.
- When adding multiple elements to a design, you may want one to appear above another. This determines the layer order.
- Select an element in Design Mode and the layer will appear within the Designs & Text panel to the right.
- Use the up/down arrows next to the Delete button to change layering order.

Deleting
To remove an image, select it. Click the Delete button in the Designs & Text panel to the right.

Rotating
- Select an object and click the rotation arrows of the Rotate control in the Designs & Text panel.
- Click left or right arrows to rotate you image clockwise or anti-clockwise.
- Alternatively, move the dial with you mouse.

Positioning
- Position objects by click & drag it with the mouse.
- Alternatively, use the Position controls in the Designs & Text panel.

Resizing
- Size objects by dragging the sizing handles with your mouse.
- Alternatively, resize images with fine precision using the Size controls in the Designs & Text panel.

Setting transparency
Depending on the type of image you have added, you can remove the 'white box' around your uploaded image.
- Use the Select Transparent Color option and select white.
This will remove all white from within your image, effectively removing the white box.

Note: Removing white will remove all white from your image. You can in fact use any color for your transparency color. Make sure it's one which is not used in the image itself.
Assessing print quality
- The quality meter gives an indication of how your image will be printed: green indicates that it will print well, yellow that it will print ok, while red that it will not print well.
- If you scale an image too much, a warning notice appear indicating that the uploaded image cannot be printed or embroidered at the size you require.

Effects & borders
Built into Studio Love 's online designer is a library of effects and borders you can apply to your uploaded image.
- To access this library, click the Advanced link in the Designs & Text panel.
The Effects and Borders tabs appear.

- A Preview pane lets you to visualize special effects. Use the Borders tab to select a suitable border for the selected image.
Adding Text
Basics
You can easily add text to your product. You can position, size, rotate and color text, as well as add special effects. Text can be controlled from within the Designs & Text panel, as well as by click & drag with the mouse.
- Click Printing Text and key in your text in the popup dialog.
- To edit text, select it and use the controls available in the Designs & Text panel.
Placing & manipulating text
Each text block you add when designing your product will appear on its own layer. Each layer provides many controls which allow you to precisely place and manipulate your text.
- Align: Left, Center and Right - mainly used for multiple lines of text.
- Position: Select up/down, left/right. Or drag selected text around the design area by mouse.
- Size: Plus for larger, minus for smaller.
- Rotate: Click left or right arrows to rotate your image clockwise or anti-clockwise. Or move the dial with your mouse.
- Font: Click the dropdown arrow to select a font from the available font listing.
- Color: Select a font color by clicking the color palette.
- Bold and Italic: Apply bold or italics to selected text by clicking the relevant option.
Editing text
Once you have added text to your product, you can edit the text. Select the text object, and within the layer control, click the Edit Text link.

Selecting fonts
- When you click the font selector, a font popup will appear. This popup allows you to select the font you wish to use for your text.
- The font popup arranges fonts by category. Select the category you want to see and the fonts will load in the right hand panel.
- Either double-click the desired font or select and click the OK button at the bottom of the popup.
Special effects
You can access text effects by clicking the Advanced link at the bottom of the text layer control.
- Effect:
Add special effects to your text. Select the effect and then set strength and color.
- None:
Remove any effect you may have already added.
- Shadow:
Add a 'drop shadow' to your text. You can choose the color of the shadow. Apply and control a blurred outline with the Blur tool. Change the shadow angle using Offset tool.
- Glow:
Add a 'glow effect' to your text. You can choose the color of the glow. Change the shadow angle with the Offset tool. Apply and control the blurred outline with the Blur and Glow Strength tools.
- None:
- Gradient:
Add a gradient coloring over the surface of your text. A gradient can be of two types:
- Vertical:
This applies a vertical color blend to the text body.
- Horizontal:
This applies a horizontal color blend to the text body.
- Second color:
In both cases, choose a second 'blend' color.
- Vertical:
- Warp:
Add a curve to your text. There are many different types you can use.
- None:
Turn off all warping effects.
- Wavy:
Apply and control wave effects.
- Expanding:
Add and control perspective effects to your text.
- Fisheye:
Create a 'fat text' effect.
- Squeeze:
Create a 'skinny text' effect.
- None:
- Stroke:
Add an outline to your text. Adjust outline settings as preferred.
- Color:
Specify a color for the text outline.
- Width:
Specify a width for the text outline.
- Color:
Purchasing
Adding items to the cart
- Once you have designed your item and you wish to purchase it, click the Add to Cart button. This is located at the bottom of the online designer.

- After you add a product to the cart, the shopping cart will appear. You have the option of continuing to checkout or adding another item.
Selecting multiple sizes
You may have created a design and would like to apply it to more than one size of selected product. That's fine.
- From the Size dropdown, select 'multiple sizes'. Quantity boxes display all available sizes for that product.
- Enter a quantity next to each size and click Add to Cart.

Removing items from the cart
You may have multiple items in your cart but wish to remove just one.
- Click the Cart tab to view your shopping cart with all selected products.
- Click the Remove link next to the product you wish to remove.

*12 minimum and two week turnaround on most items. See product details for exceptions.


